Friday, September 25, 2009

Colorful Doodles and Squigles

This was made playing mostly with markers and a sprayer. I also used some gel pens. Nothing beats doodling for a relaxing good time.

Sunday, September 6, 2009

In the mist of spray painting experiments


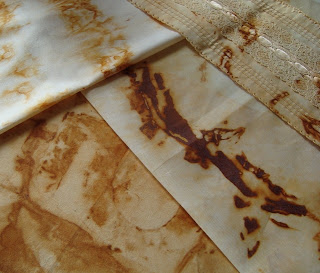
I'm in the mist of my second Stencilry class with Mary Ann Moss http://dispatchfromla.typepad.com. Mary Ann's a wonderful artist and teacher. I've made my own stencils and am learning to layer, layer, and layer paints. The last image is one I've done on fabric. Please check my blog for more info. http://dianehamburgart.blogspot.com


Thursday, July 2, 2009

Revisiting Encaustics


This is the series I worked on in June on 5" square cradled boards. I used beeswax, alcohol inks, vintage buttons, and paper.


Saturday, June 20, 2009

Open door and Beaded heart

The summer has been hot and busy. Here are two mini quilts I have finished. These are pieces that were quilted first, painted, stitched and then beaded. The beaded heart is 3" x 4", and Open Door is 4 1/2"x 4 1/2"


Monday, June 8, 2009

Photoshop and me

This is my first attempt at Photoshop. All the pieces are from a Fabric Art Workshop.

Sunday, June 7, 2009

Locking Zentangles

I love making Zentangles. This interlocking one was fun to do.

Friday, May 15, 2009

Layering


I prefer to surface design my own fabrics but have a huge stash of commercially printed fabrics that I need to work with so....

I machine stitched a bunch of blues and greens, cut in curves, layered them, then stitched them down onto canvas. I added beads, crocheted cords to finish up.

Check my blog http://dianehamburgart.blogspot.com for more on layers.

Tuesday, May 12, 2009

Lace look by burning

This is a piece of upholstery fabric that I free motion quilted onto a piece of felt and then melted with a heat gun to get a lacy look.

Sunday, May 10, 2009

Weekly Challenge

Happy Mother's Day!

Happy weekend to all of you. Sorry, I have been off-task with this lately. I had a monster graduate class that just ended. I thought I would explode. I have the same instructor for summer school but hope it will be better since I will be out of school June 5th.

My challenge to you this week is to layer, layer, layer. It does not matter what. Just layer fabric, colors, paper, clay, buttons, whatever you want. Just layer, layer, layer, and then layer some more. Just don't create mud.

Monday, May 4, 2009

New batch of ATC's


A series of ATC's
cotton fabric, dyed guaze, hot glue and foil, crystals

Thursday, April 30, 2009

Some writing on fabric


I started with a monoprint and wrote some words with a medium point metallic pen then added some phrases with a smaller pointed pen. I plan to machine sttich and make into a journal book cover. I do love words and writing "words" to live by was nice. Thanks for the challenge.

Remembering


I have lots of rust dyed fabric. I love its natural earthiness. I used an old ford truck photo to make a screen print, and then the tree doodle is a screen print. The rest is stitched and beaded.

Sunday, April 26, 2009

I love making things from scraps


This last week I have been working on backgrounds that fit in pretty well with your challenge.


I had a bunch of white fabric that I had saved to use for foundation work. I was given a bunch of rusty horseshoes that was able to use to dye with.


This is a sample piece of silk that I stamped with Luminere using bubble wrap and string.

Sample piece of silk stamped with Luminere paint using cardboard circles and hand made stamps from a cut up Styrofoam plate.

Rusted fabric printed on a ink jet printer with a music score.

Weekly Challenge

Sorry, I was not around the last couple of weeks. I was crazy busy with the Quilt Fest. This week's challenge is to use found materials or every-day materials to create backgrounds. You can use paints to help you out. Think string, think ads from the mail. think bubble wrap, think the middle of a corrogated box. Think green. I am in green mode since we just had Earth Day on Wednesday. Use coffee or tea as a stain instead of paint to create your backgrounds.

Have fun this week.

Tuesday, April 21, 2009

Palette Knife & credit card Experiment


I didn't go to the hardware store but pulled out my palette knife and an old credit card. Here's my efforts. Dotted on the paint and scraped down. It's obvious to me I need to experiment more. It was fun! I believe I'll add some stitching and beading before creating book covers with these.
Check my blog to see two new pieces!

Sunday, April 19, 2009

Frida quiltie.


here is a quiltie I made for a trade in order to celebrate frida kahlo's centennial this summer.It measures 12"x12".

Tuesday, April 7, 2009

Friendly Plastic is friendly


This is my first attempt at making embellishments out of Friendly Plastic.

Monday, April 6, 2009

Weekly Challenge

You will have to tell me if I begin to repeat myself. Things tend to blur together because I do so many things at one time. This week's challenge is to write on fabric. What I have been doing is writing letters to my sister who passed away last May. I am telling her things that I wanted to let her know but never got the change to tell her before the cancer took her. I am not sure it is making me feel better but I feel the need to write to her. I have been writing on dyed muslin with Gelly Roll black pens - which work great BTW. You can also use black Sharpies. Just write about whatever you want. Just write, doodle, whatever you want to do. Then take what you have written and use it in your art. I have taken parts of my letters and used it in my fabric books. I have taken sections in it and have used it as postcard backgrounds. I have used it as flower petals. I had created puffy geometric shaped with it. It did not matter whether I could read the words any more or not. What mattered was that the words came out of me and that they were not bottled up inside me any more.

I am digressing a lot this week. So, you are to write on fabric this week. Just write, write, write. Take what you have written, cut it up, quilt it up, sew on it, do whatever you want, and create something with parts of what you have written. Have fun.

Sunday, March 29, 2009

Weekly Challenge

I am muy busy trying to get ready for the Quilt Festival and working on my reading cohort (my reading master's class). I literally have a paper due every week - in addition to my regular reading and weekly assignment. I am kinda cranky right now.

This week's challenge is to go to your hardware store and go to the paint section. You have to spend about a buck ($1) and buy a plastic putty knife or putty spreader about 1.5 or 2" wide. If you don't know what one looks like, then you can just Google it. Here is a pict as well. I would scan but my scanner is on the fritz again.
http://www.amazon.com/dp/B000VAB4WM/ref=asc_df_B000VAB4WM752322?tag=the004-20&creative=380337&creativeASIN=B000VAB4WM&linkCode=asn

http://tinyurl.com/c7feht Here is a tiny url link in case the long one above breaks.

I would not buy one wider than 1.5-2" because you lose control with the really wide ones. Splurge and buy a couple of them. They are very useful tools. I don't bother to wash them much. I just use a paper towel and wipe them off as I go along. I use several at once. They kinda gunked up sometimes because I forget to clean them. They then become part of art pieces or I toss them aside and use cleaner ones.

Instead of using a paintbrush, paint using the putty knives instead. Use these and apply molding paste or gel medium. You will get great texture.

Another thing you can do is take put some paint on a paper plate. Pick up the paint on the plate with the putty knife and spread the paint with it onto your surface. Scrape the paint along your surface. You will get great texture especially if your surface is kinda uneven. I do it with something bumpy or textured already on my surface. It works great.

Something else you can do is this. Take some different colored fluid acrylics or slightly watered down acrylics and squirt onto your substrate (paper). Do so randomly and sparingly. Scrape your surface in long sweeping strokes with your putty knife to pick up the different colors. You will be amazed at the colors that come up. Squirt again in uncovered spots and repeat. Do not go over with paint already on your putty knife or it will be muddied. Just put the excess paint on another piece of paper or scrap. You can use that for another background.

Pick up some molding paste, gel medium, or other texture medium with putty knife. Apply to your substrate. Make sure your substrate is heavier like watercolor paper, chipboard, or heavy cardboard. Swirl, cut, make chopping motions, and randomly apply medium onto surface so you get some cool texture. Let dry completely. Paint when completely dried. You might try flexing it in the opposite direction to see how it cracks when it is dried. I love cracks. I also love to use iridescent gold paint on the peaks of texture. You might want to try house paint with this. BTW, you can color the medium before applying it onto your substrate. I like to color it after I apply it. I am never sure how I want the color to look until after the acrylic medium dries.

Putty knife works well with crackle paste, too. Thicker layer for wider cracks. Remember to have fun. It is okay if you can't do it every week. Just remember to take a breath and to do art whenever you can. I am trying to fit a bit of art in whenever I can - even with my hectic schedule.

Saturday, March 28, 2009


So,I can finally reveal my secret project!It was a fabric book exchange with a spring flower theme.

Friday, March 27, 2009

Post Card painting

I am taking an online drawing class at World of Whimsey, so I made a small drawing for my post card. The class is great! It is a lot about making drawing. So far, I feel that my images are still too formula, but think that in the end, it will be much more about individual self-expression.

Monday, March 23, 2009

A Day Late - Weekly Challenge

Sorry, out of town for cheerleading nationals. I am still smelling chlorine in my hair. It was in Wisconsin Dells. It is only fun if you are a child groovin' on water slides.

This week is all about mail art. I am finally catching up with all the postcards that people sent to my 6th graders. Your job this week is to blow the dust off your paper cutter and cut a piece of card stock to a 4x6 size. Okay, you can cheat and take a piece of background that is around that size and cut it to 4x6. It can be fabric if you want. You need to put a focal point on it. Do something to it but it needs to be flat so you can just stick a stamp on it to send it to someone. NO fair if you put it in an envelope to mail it off to someone in pristine condition. You have to address and stamp it on the other side. You have to mail it to someone who is NOT an art person. Yeah, they might not get it. They might not appreciate it. BUT, but, but, you are spreading the love. You can always make more than one and send that one to an art person so you know it will be appreciated and loved - no matter what. You know that you can do whaever you want, I will never know the difference. I am just making it up as I go along. Do make the flat postcard and send it to someone. Make one for yourself and send it to yourself. You will come across it one day and it will amuse you. It amuses me when I come across it every once in awhile. I do it every so often when the urge strikes me to mail out an art card. I get in the mood and will do mail out a couple times a year.

Fast Eyes, if you are reading this. I so love the mail art that you send to me! You send me the very best postcards - art cards ever!

Go out and find some funky postage!

Saturday, March 21, 2009

A new day for me


Today I took a class from Jesse Reno. This is one of my pieces. So much fun!

Monday, March 16, 2009

Secret Project.


Hmmm,I finished my secret project that I have been working on for the last few weeks...it is an exchange so I can only show little sneek peaks!

Sunday, March 15, 2009

This Week's Art Challenge and Technique


This is a technique that I have posted before but with a little twist in it. I think I got it from some magazine workshop. I don't remember what the name of it is now. I think it was Faux Metal or something like that.
You will need the following supplies:

piece of chipboard, cardboard, or something like that
masking tape
Coarse sandpaper
little pieces of text
paper clip or something with a sharp edge for gouging
Tim Holtz Distress Ink in Mustard Seed (yellow), Frayed Burlap, and Green (optional)
glue stick or whatever glue you like to use
whatever other embellishments you want


1. Tear off little pieces of masking tape and put on chipboard. Overlap the pieces of masking tape so that it covers the entire area of chipboard.

2. Use the end of your paperclip and gouge marks into your masking tape surface.

3. Use the coarse sandpaper and rub into the masking tape surface and all of the edges. Wipe off residue. Don't be shy here. Apply some hard pressure.

4. Use a glue stick and randomly apply small pieces of text onto masking tape background. Let dry.

5. Use Frayed Burlap and apply all over surface of background. You can leave some of the text areas and use mustard seed on it later. Use mustard seed on the text areas and the green on the areas besides the text areas as accents, if you want. Let dry.

6. Add embellishments to the background.

7. Add focal points/images and complete your collage or art piece.
Belinda

Tuesday, March 10, 2009

Altered Photos


I have been having fun combining photos that I have taken with my art that I have scanned. Photography is as great a love as other art for me, so I'm always looking for ways to combine them.

Chrysti Hydeck has written an article about this in the Jan/Feb 09 issue of Cloth Paper Scissors.

Some ATC eye candy - Bristle ATCs


If you are coming to the Quilt Festival in Chicago, come by the Quilting Arts/Cloth Paper Scissors Booth to learn how to make them! This was all the artwork I had time to do in the past week with ISAT testing!

Sunday, March 8, 2009

Susan M brayer contribution for Weekly Challenge


made this using a Traci Bautista technique where you lay down dyed and still wet paper towels, then your paper and then a stencil and brayer over it. I embellished the flower with ink and some paint.


Susan M.
(Comment: pretty slick! It will make a great background- Belinda)